

I want to start a project page on my ongoing work on my XJ rig. I'll start with this post on new winch install.
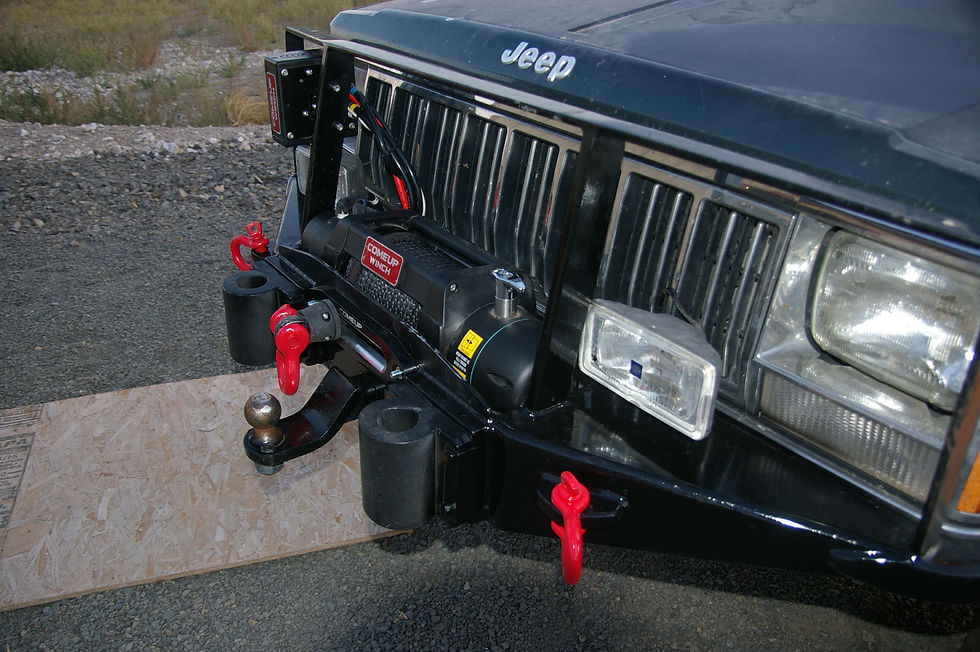
Well, after winning the new Comeup winch at the ralley the end of June, I finally got it installed today! I had to modify my bumper and with the help of a shoe horn and a good amount of some slippery stuff, we got it in. Now I get to strip off all the rope and wind it back up under load so it fits nice and tight. I had to mount the controller in an akward place because it blocked too much of the radiator if it was mounted on top of the winch itself, but it will work just fine! I also took a page from Aaron's book and decided to not use a hook, but instead, chose to use a 3/4 shackle instead with a rope stopper from Comeup winch. Thanx Aaron!
Got another project completed. We built a drawer system for the rear of the Heep. It has two drawers, a tall one in the lower and a shallower one at the top. I used 1/2 inch plywood for the box frame. We decided not to go with the expence of using ball bearing slides. I had some aluminum angle and some 1/4 inch UHMW on hand, so combined them to make the slides. Bolted the aluminum angle to the sides of the box using plywood T nuts and 1/4 inch bolts. Then using short flat head wood screws, attached the !/4 inch UHMW to the drawer bottoms. Very happy with how easy and smooth drawers slide. I can extend drawers out to about 6 inches of full extension with no noticable sag, very sturdy even with weight in them. Used tan outdoor carpet for top and front faces. I put 4 footman loops on the top so we can strap what have you to the top with no worries of anything falling or flying around inside. The rear face is on hinges and folds down to double as a table for fixing lunch etc on day trips. The right side is fitted to hold an average sized cooler, I see no reason for us to invest the dollars for a fridge at this time. The front face holds a D ring handle shovel, axe, saw and a machette. These are held on with a good sturdy rubber hose that stretches tight to prevent any wobbling or rattles. Shovel is attached with Mag Lite mounting brackets! Will have some pics up in a few here. Next project is already under way. A box for my air compressor and second battery where the back seat used to be. Pics of this when it's done soon.
Looking good! You gonna do gas struts on the lid to hold it open?
This is before I put cutout on rear. It shows the general shape of the tent frame. These hoops lay down on top of the full size queen mattress when stowed. Dimensions of tent base is 5X7 feet. mattress fits with a couple inches to spare. Hinge bolts for hoops are anchored with plywood nut plates and 5/16ths bolts. End of conduit is flattened where bolts pass through. The building inspector has to get in the pic too! Lilly Mae sure likes to be involved!
Howdy again. I have been busy the past couple of weeks working on the trailer and RTT base. I will post up some progress pics here and tell the story on each pic.
Another project done and ready for the trail I think. I built a basket to hold my Xbull trax on the rear of our XJ while on the trail. I bought some 6061 1 1/2 X1/8 flat bar and bent up the pieces. I bolted it all together with 1/4 20 stainless bolts with nylock nuts. The cage is mainly to hold the Xbull trax untill the attached straps are cinched down or when accually using them on the trail. A few pics to follow from Vickis phone, cause I can't seem to make mine work downloading pics. GRR.
Also shouldn't 5/8s grade 5 be 38 kips not 19 ?
Hey you're missing a zerk 😁
Looks great !
Finally got the articulated hitch coupler made and installed. Works wonderful, a bit snug to hook up, but not bad at all. I discovered that I will need to replace my safety chains with longer ones, as the trailer end of the coupler is enough longer than stock, now chains are too short, not a big deal. All pivot locations have greasable zerks to reduce wear and tear. 360* rotation, 90* up and down and 90* side to side. I will be adding a far more solid tongue jack with a large inflatable wheel so it will be easier to move around. I will start more mods on the trailer in the next week. lowering the tall sides and welding in stake pockets so it will be more versatile. Then it will be time to start the RTT build. That will be a fun build as it will end up looking like a covered wagon when done! I am no good at doing in progress pics, so will post a few maybe and then a complete walk around photo series when tent is done. Hope to have it all finished in time for the RALLY!!!
Close up showing it hooked to Jeep. I know Aaron, it still needs one more zerk. I ran out! The gold colored pin unhooks it from the Jeep.
Showing complete new coupler. The pin on the trailer end can be pulled and coupler extended about another 8 inches. Pin can also be removed and a standard ball coupler installed on the trailer end to drop onto a std ball on the tow vehicle so it becomes legal to tow on hiways. the articulated coupler is not DOT approved even though it is undoubtedly stronger.
Another view of coupler. The 1/2 inch bolt on top of trailer end is so I can snug it down to negate any rattles. All bolts are grade 5 or better. A grade 5 5/8 inch bolt has a shear strength of just under 19,000 lbs, so I am in no way worried about anything breaking on the trail, my trailer will be under 1000# total. The pivot bolt is a 7/8ths grade 5 bolt. wanted to use grade 8, but didnt want it getting brittle after welding. Pivot knuckle is solid 2 inch steel! I may drill large pivot bolt and put in a cotter pin behind nylock nut, just for peace of mind. A bit of touch up paint and we are good to go!
Project under way now is a fully articulated coupler for the trailer. Not good at build pics, but will post up pics when finished. Like everything I build, it's probably way overkill. LOL.
Showing the final location of the fairlead on new winch. All winch bumper mods done now. Ready for another Douglas creek "winch out Canyon trip". LOL
On our trip last weekend on the Stevenson WABRDR run, We discovered we had a U-joint on the front axle, driver side going bad. We had to put the glove box/ electronics project on hold untill I got the new joints installed. Went ahead and did both sides. Good thing too, as both were rather dry. Now that this project was completed, we were able to resume work on the glove box wiring project. I had an aluminum plate sheared and bent at a local HVAC company, as they have a sheet metal shop. I ordered some electrical bus bar/ power strips and started getting it layed out. We used to have a tangled mess of wires etc. We run a 300wt power inverter, a cigerette lighter multi outlet, Phone chargers etc, so with no organisation, it was a royal mess. I had some LED mini light bars to mount on top, one on each side and two on the rear, for side work lighting and two in the rear for back up etc. So I got those mounted up and wired in and ran the wires through the roof with a rubber grommet all sealed with cylicone adhesive sealer, then down the A pillar behind the trim. Horid job dropping head liner and trim without any damage! Mounted the bus bars, one for ground wires and second one for power strip. All insulated and organised. What a novel concept, something this old redneck is not used to! LOL. Mounted four lighted switches even though we only needed three for lights but you never know when another may be needed. The inverter, new power plugs with USB ports and cradle/ charger for new hand held UV-5R are all mounted with automotive trim double sided foam tape. All the connections and wiring are all behind the pannel out of sight! So kewl as no more tangled wires and it looks gr8!. I had removed the original glove box lid and latch to make room for new setup. I saved all old parts so it can be put back to OEM if ever needed. Next project will probably be the roof mounted water system. Two tanks, one for washing and general use the second will be flat black for hot/ warm for showers. Should be about 11- 12 gallons total. 6 inch PVC pipe.
Ok, update time. I finally got around to re-winding rope on tight and found a had a minor mod to still do. While spooling the rope back on under load, I discovered it was leaving a small amount of black residue on the bottom of the Hawes fairlead. HMMMMM! I called Come-up winches and talked to a tech guy. Explained the issue with him. He asked a few questions and it was decided the fairlead was too high. It was in the same location as my old Smitty winch roller fairlead, about centered with drum vertically. This was putting too much down load on the lower side of the rope slot. We decided I needed to move fairlead down so the slot was located so the bottom of the slot was at about one wrap from full drum and this put the top of slot about one wrap from an empty drum. Works far better now! Not a big mod, but it saves my rope from undue wear.
I was just razzn ya Aaron, I have no doubt that could happen. Which manufacturer was it? Ill have to show you some of the ones I have made. I designed and have made several true kydex pancake style for several different types of pieces. It does'nt have the big funky add on square belt loops like so many of comercial ones do, more like a leather one does. I used to do leather work for many years but leather is getting so expensive and hard to find anymore.
Not intentionally 😛 I used to work fora holster manufacturer...we did more than one warranty replacement that was hot car related...
The downside of Kydex (or any brand of PVC-acrylic) is that it's malleable at a fairly low temperature. Your Jeep on a hot day, especially where you live, could see some deformation.
Some of the things I need to add or upgrade, build a water system that mounts on rack to carry fresh water on one side of the spare and hot water for shower on other side of spare, mount side flood lights over front doors and spot LED lights on rear corners. I mentioned above about glove box area, also rear storage area will get a total make over with drawers etc for better access to recovery gear and a built in slide out table etc. One project I have been putting off far too long, is a set of quick discos for the front sway bars. We have a small utility trailer that we want to modify and set up so it can be more suitable for off road use and still be able to function as a utility trailer. Maybe even get a home built RTT that looks like a Conestoga covered wagon when set up. I hate things tangled and rattling in the rig! Lots of pics as we move along. I will post up some of projects already done soon.
Aaron, I was talking to you at the Quillomine trip about how I want to do the glove box area in my jeep. Today is the day that project gets started. It will have a perminant mount for mt 300wt inverter and cigerette lighter multi port as well as the switches for overhead outside lighting. I will make two Kydex pockets for our phones etc. Should help to get all wires etc tidied up and a place for all things currently tangled. Also a pocket for new hand held radadio! I will post pics of that project on here. So many things I want to do with the Heep XJ this winter. And our off road trailer too. HMM, where to start.
Ooh machined aluminum one....good idea! :D
Aaron, if you go to Comeups website and go to accs page, they sell for about $15. Way cheaper than the machined alum ones for $150.! My shackles won't be out there all the time. Just for the pics and trips. We are meeting up with Darin and his group sat in Packwood to do the Pack to Eburg stretch of the WABRDR. Does anyone know of a place where I can get a GOOD fitting cover so that the sun can't attack my expensive rope? One that is easy to get on and off when needed and doesn't look like you just wraped a gunny sack over it? LOL
Hmm..Now I may copy YOU with the rubber stopper so that my shackle isn't just hanging out in the weather....
Warrior products makes a quick disconnect bracket for license plates over the hawse but it may not fit with the thimble.
Seth really got me thinking about the come up winch when I was checking his truck out at the rally. the way those things free spool is amazing. zero effort.
My lisence plate used to mount on the roller fairlead, but now not sure where to put it. Is it legal to put it on the front of the roof rack above the windshield?
I know the controller looks funny where it's at. If anyone has a better idea I'm open to sugestion.